How to implement Cuprite into Capybara
Diario del capitán, fecha estelar d14.y40/AB

We've all been playing with testing libraries and frameworks for many years, but before doing that, we have to configure them. In this blog post, I'll walk you through my setup of Cuprite with Capybara.
Last week, I changed one of our project's Capybara's JavaScript driver from Selenium Webdriver to Cuprite this article by Evil Martian's. I built a simpler implementation and I thought that it could be interesting to share the key points of this implementation here.
For those who do not know it, Cuprite is a Capybara driver using Chrome to execute the tests through Chrome's CPC Protocol. We can use Cuprite instead of Selenium to test integrations requiring JavaScript to work. The most important feature of Cuprite is that we can connect remotely to the browser to execute the tests and debug the JS and the CSS there.
I will go into more detail later on but these are the key points of my implementation:
Alright, let's get started!
Install the cuprite gem:
group :test do
  gem 'cuprite'
end
And configure it in spec/rails_spec.rb:
require "capybara/cuprite"

Capybara.register_driver(:cuprite) do |app|
  Capybara::Cuprite::Driver.new(
    app,
    window_size: [1200, 800],
    browser_options: { 'no-sandbox': nil },
    inspector: true,
    url: ENV['CHROME_URL']
  )
end

# Configure Capybara to use :cuprite driver by default
Capybara.javascript_driver = :cuprite
After these steps, we have to configure Docker's configuration.
Add the "chrome" container in the docker-compose:
services:
  # ...

  chrome:
    image: browserless/chrome:1.31-chrome-stable
    ports:
      - 3333:3333
    # Mount application source code to support file uploading
    # (otherwise Chrome won't be able to find files).
    # NOTE: Make sure you use absolute paths in `#attach_file`.
    volumes:
      - .:/app:cached # change it for your rails' container directory
    environment:
      # By default, it uses 3000, which is typically used by Rails.
      PORT: 3333
      # Set connection timeout to avoid timeout exception during debugging
      # https://docs.browserless.io/docs/docker.html#connection-timeout
      CONNECTION_TIMEOUT: 600000
I added a test container to load the chrome container as a dependency:
services:
  # ...
  test:
    # ...
    environment:
      <<: *env
      CHROME_URL: http://chrome:3333
    depends_on:
      - postgres
      - redis
      - chrome
Next up, I added a command to create a method named 'debug' that helps to stop the test and open the browser (The Cuprite command to do this doesn't work in this implementation) 🤷🏻♂️
module CupriteHelpers
  def debug(binding = nil)
    $stdout.puts '-------------------------------------------------'
    $stdout.puts "🔎 Open Chrome inspector at http://localhost:3333"
    $stdout.puts '-------------------------------------------------'
    $stdout.puts ''
    return binding.pry if binding

    page.driver.pause
  end
end
... and some changes in the spec helper, to fix the routes and allow Cuprite to work with WebMock:
# spec/spec_help.rb

LOCAL_PORT = 8200
LOCAL_IP = if ENV['CHROME_URL']
             Socket.ip_address_list.find(&:ipv4_private?)&.ip_address
           else
             'localhost'
           end

#...

config.before(:each, type: :system) do
  driven_by :rack_test

  Capybara.app_host = "http://#{LOCAL_IP}:#{LOCAL_PORT}"
  Capybara.server_host = LOCAL_IP
  Capybara.server_port = LOCAL_PORT
  Capybara.always_include_port = true
end

# To no block the chrome calls if we are using WebMock
WebMock.disable_net_connect!(
  allow_localhost: true,
  allow: [LOCAL_IP, 'chrome']
)
And now, let's try it!
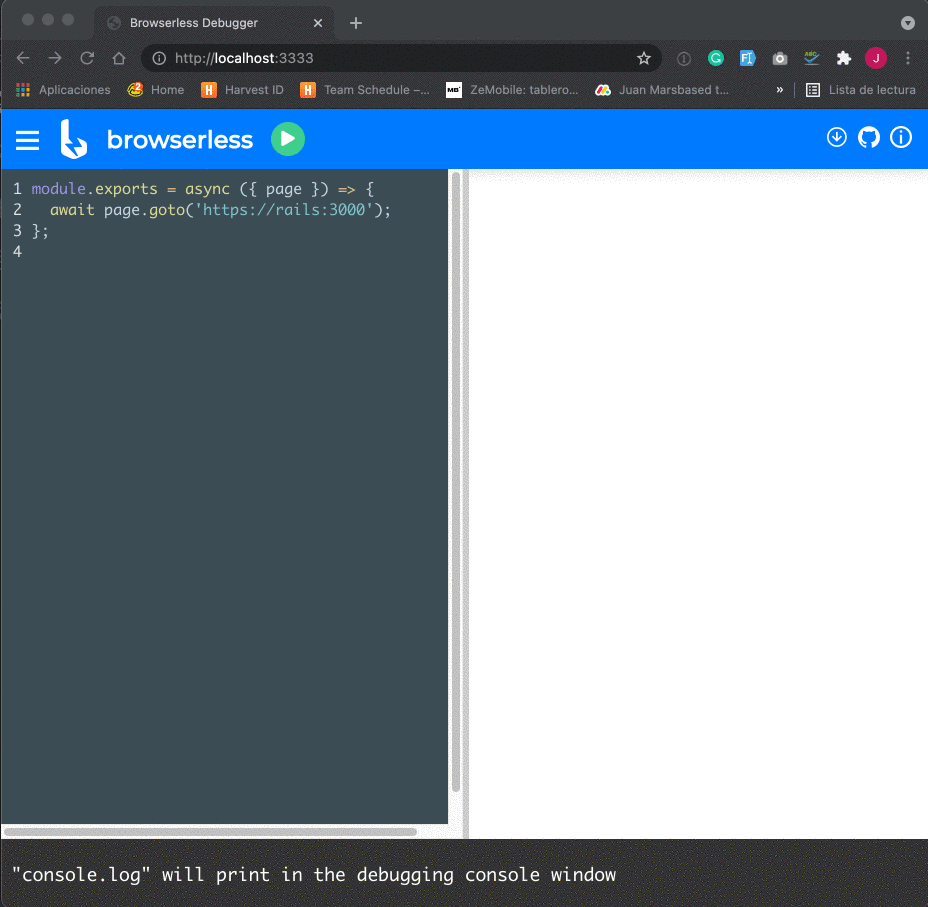
To debug a system test in the browser, we need to follow the next steps:
Some useful commands that you can use in your JS testing system, in this part of the guide!
Cuprite uses the Ferrum Gem to work. You can access the Ferrum browser and execute Ferrum's command:
browser = page.driver.browser
browser.mouse.move(x: 123, y: 456).down.up
Scroll the screen:
page.driver.scroll_to(left, top)
Wait until Ajax calls ends:
page.driver.wait_for_network_idle
Refresh the browser:
page.driver.refresh
Add basic authorization:
page.driver.basic_authorize(user, password)
Work with cookies:
page.driver.cookies # => {....}
page.driver.set_cookie(name, value, options = {})
page.driver.remove_cookie(name)
page.driver.clear_cookies
I think this is a big improvement in the debugging process because it fixes a very important part of the problem, when you are debugging integration tests.
Sometimes we have problems in the test itself because debugging the HTML, or even with screenshots, is always hard to find the problem. For instance, a form field that is not filled properly, a link that is hidden or covered by another element, etc. In these cases, you can for example add the JS tag in the regular system test (js: true) and debug them in the browser to find what's wrong with it.
Another interesting take for Cuprite in my project, in particular, is that I can use Rack Session Access with Cuprite without problem, which would not be possible with Selenium.
Last, but not least, I wanted to thank my colleague Màxim for helping me out with this! Moltes gràcies, Màxim!

We've recently gotten our hands on Kubernetes, and we've compiled a quick guide on how to get started.
Leer el artículo
We have been working with Shopify for a good while now, for all kinds and sizes of e-commerce sites, but we've been lately experimenting with GraphQL and React-based frontend applications to enhance user experience to unprecedented levels, so we've compiled some guidelines for you.
Leer el artículo
MySQL and PostgreSQL are very similar but not exact. Take a look at this scenario that works with PostgreSQL but not with MySQL.
Leer el artículo